Showing posts with label 50s/60s/70s Style. Show all posts

Monday, 14 January 2013

Mebloteka Yellow - design cafe shop in Lodz

I spent Christmas time in Lodz, Poland. It is my home town. It's the third biggest city in Poland. It used to be a textile industry centre, a bit like Manchester in the UK, but now most of the factories are closed. I call Lodz a city of factories and palaces. The palaces used to belong to the owners of the factories and some of them are beautifully preserved and open to the public.


Most of the factories however stood empty for a long time and few of them were in a very bad shape. Until recently, when things started to change. Now Lodz is getting to be a very exciting place to be. More and more factories are being restored. Some became loft style apartments, some offices and some shopping centres.

'OFF Piotrkowska' became the hub of design studios and creative businesses. One of them is Mebloteka Yellow - a gallery, a cafe and a shop selling handmade products with a vintage feel, mostly fashion and homewares.


A friend of mine told me about this place, and as soon as it opened after Christmas, I was there.


The atmosphere of Yellow is amazing. You can feel the creativity buzzing. It is a meeting place for local creatives and more and more people are now discovering it. You can learn more about it here.


OFF Piotrkowska was one of the venues for annual Design Festival in Lodz.

If you come to Lodz, put it on your list of places to visit. I really recommend it.


Share/Bookmark

Thursday, 15 November 2012

Hatome Cushions with Mid Century feel

My little Hatome brand is growing!
Here are a few new cushions I have made using Mid Century fabrics which I have been collecting for a long time. I am finally putting them to good use.


This one has a fairytale theme and it would be also suitable for a children's room:


I used some vintage and some new Japanese fabric to sew this one:


The backs of the cushions are made with a contrasting colored thick cotton fabric, with a neatly concealed zipper.


Te cushion covers can be machine washed at the temperature of 30 degrees C.
Here is the link to Hatome shop on Folksy (UK online marketplace for arts and crafts):

www.hatome.co.uk


Share/Bookmark

Wednesday, 15 August 2012

New happy abstract paintings

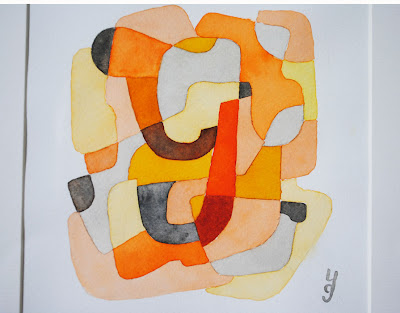
Here are some of my new paintings, which can be described as Happy Abstract paintings.


There were inspired by Mid Century designs and interiors. I love all about Mid Century period: the architecture, the fabrics, the furniture, the illustrations.


These pictures will look very well in both Modern and Vintage home. I hope they will make you smile.


The colors are bright and energetic, they move the energy around.


To see more, go to my shop www.yolantaprints.etsy.com

Yolanta


Share/Bookmark

Wednesday, 18 July 2012

Abstract Art for Children

I recently found myself painting almost abstract pictures for children. Here are some examples:


I guess it is quite important to train a child from early age to appreciate art and expose them to different forms of art. Then later they will make confident choices when it comes to all sorts of designs and esthetics in life.

I still remember vividly the paintings and prints on my parents walls when I was a child. I used to watch them for a long time and get lost in my imagination.


Colors and shapes are inspiring. They feed your soul. They can lift up your mood and make you feel happy for no reason.


To see more go to www.yolantaprints.etsy.com


Share/Bookmark

Monday, 2 July 2012

Pictures inspired by Crystal Palace

I live in South London, in the area close to Crystal Palace Park. I will write about this special place more in another post, as it really deserves it, but today I wanted to share with you my two new paintings inspired by Crystal Palace.

The first picture is my free take on the iconic Crystal Palace TV Transmitter:


I paint in Ecoline watercolors (by Talens), which are my favorite. The colors have amazing luminosity. Here is the detail of this painting:


There are a lot of dinosaurs and other prehistoric creatures in the park (well, only concrete ones...), so my next picture is showing one of the dinosaurs:


The pictures look good together on the Mid Century sideboard in my studio:


You can see more at www.yolantaprints.etsy.com


Share/Bookmark

Friday, 29 June 2012

Yolanta Prints on Etsy

I am very excited! Yesterday I finally opened my art shop on Etsy, called Yolanta Prints. It contains the first four items to begin with, but I will be listing new items almost on daily basis. This is the first item, the Elephant. It's good to start with an elephant, as it is a magical animal. It is also connected to Shri Ganesha, Indian God of innocence and wisdom, who has the body of a child and the head of an elephant. He removes all obstacles.


In Yolanta Prints shop I am selling limited edition prints of my original watercolor illustrations. The prints are signed and numbered and sold unframed. Here is another print, a little abstraction with a letter 'Y'.


To see more, please visit my shop: http://www.etsy.com/shop/YolantaPrints?ref=si_shop

I am having fun with this series. I am focusing on painting, painting, painting and it feels good. 

See you soon
Yolanta
Share/Bookmark

Thursday, 26 April 2012

Before and after

I am back. Sorry I have been away for so long. There was a lot of work to do in the house and it took all my energy. Also, I was forever looking for things. Now the renovation is almost finished and we have started to unpack. So I am showing you the first 'before and after' pictures. This is what our living room/library looked like when we moved in:


And this is what it looks like now:


We bought two more bookcases to accommodate all the books we have. And while filling the shelves with them, I also filled three bags of books to go to the charity shops.

I got this wonderful yellow painting from my very good friend and an amazing artist, Lorna Wilson. See her other paintings here.


I have chosen blue for this corner of the room because of Feng Shui. It represents the element of water. Instead of hanging the curtains in the windows, I used self-adhesive film to block the view from the street and let the light in.


On the shelf you can see the sculpture by my aunt, Jadwiga Janus. She began her art career in the sixties and is a well known artist in Poland. I love her work.

This is just the beginning. I hope our home will evolve with time and acquire it's own character naturally.

Yolanta


Share/Bookmark

Sunday, 15 January 2012

Taking one day at a time

I am in a strange stage in my life when I am extremely busy and at the same time it feels like time stands still and there is no change. The house renovation is going very slowly. I was hoping to take some 'before and after' photos but all parts of the house are in a permanent 'before' stage.

I feel strangely suspended. Almost all of our life comforts are gone. The things we usually take for granted: the central heating, the bathroom, the toilet and the kitchen take on a new meaning and are reduced to the mere essentials. Did I mention that we are camping in one room?

A deep tiredness sets in and to stay motivated I have to remind myself of our achievements:
- Eco boiler: fitted
- Bathroom tiling: almost done
- Bath: fitted but not working yet
and so on....

But there are some bright moments: yesterday we discovered some newspapers hidden under the floorboards, dated 1950:


There was also a nice piece of wallpaper which we discovered under two other layers of wallpaper:


Unfortunately this wallpaper is in a bad state so we cannot leave it uncovered, but we left it for a few days, just to look at it. It probably dates from 1950 when the house was built. Our house is one of 5 modern houses in a row of Victorian houses. They were built on the site of the buildings destroyed by the bombing during the Second World War.
.
Share/Bookmark

Wednesday, 7 December 2011

2 lamps upcycled with Japanese fabric

On our trip to Japan in October this year I managed to source some beautiful Japanese fabric. Here are the two lamps that I have upcycled using this fabric.

The first lamp is called Hatome Oriental lamp. I had this vintage wooden lamp base for some time and have been looking for the right fabric to go with it. When I finally saw this wonderful thick cotton fabric in Tokyo I knew it would be perfect for the lampshade. I added some decorative cotton trimming to the edges for an additional visual impact.


I love the combination of red and turquoise, don't you? It is so uplifting.


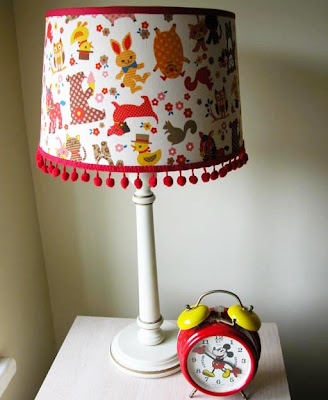
The second lamp is called Hatome Happy Lamp. It has off-white vintage wooden base which originates from the 1970s. I upcycled the lampshade with this colorful cotton fabric which I could not resist when I saw it in Tokyo. It makes me smile every time I look at it.


It seemed appropriate to finish this lamp with red pompoms so that nobody has any doubts about how serious it is ;)


For the details of the lamps click on the Hatome shop link in the top right corner of this blog.

Love
Yolanta
Share/Bookmark

Friday, 2 December 2011

Two Hatome lamps with distinctive personalities

As Winter approaches and the world descends into darkness (at least in Northern Hemisphere), good sources of additional light at home become more and more important, to safeguard us from Winter blues.

Here are two lamps I recently created. I try to give distinctive personality to each of my Hatome lamps.
This one is bold, colorful, brave. I called it Hatome Fantasy Lamp. It has an original 1970s lamp base and I recovered the lampshade with the vintage 1970s fabric.


I finished it with some very fancy decorative trimmings for visual impact. Little glass beads catch and reflect the light when the lamp is switched on and it looks really pretty.


The second lamp is called Geometric Retro Chic Lamp. This lamp is elegant, chic and warm. It has the original 1960s/70s brown ceramic base. I recovered the lampshade with a beautiful 1960s/70s vintage fabric.


If you would like to see more, go to my Hatome shop on Etsy.

Thank you for visiting this blog.
Yolanta
Share/Bookmark

Wednesday, 23 November 2011

Winter blues

It is so cold today. Not below zero yet, but close, the winter is approaching fast. I have been working on the new lamp, in blue color, how suitable for this time of year. This is the story of the lamp:

Last weekend D and I went to Rayleigh, a small town in Essex, where he gets his hair cut every month. While he chats to his hairdresser about music, I use this time to rummage in the second hand shops for the materials for my Hatome lamps. This time I found a treasure:  1960s/70s blue glass lamp base, a Mid Century Ikea classic. I was so pleased with it, especially when next day I found the ideal fabric for re-covering the lampshade. Because next day we went to the Vintage Fashion and Accessories Fair in Hitchin, Herts and I bought this beautiful 1970s linen tablecloth featuring blue and purple flowers.

The blue lamp is now ready:


I also got this 1970s ceramic tea pot which goes nicely with the lamp:


As you probably noticed, I placed a new gadget on this blog, it is the link to Hatome shop. Have a look and let me know what you think. I would be grateful for your feedback.

Yolanta
Share/Bookmark

Saturday, 19 November 2011

My first steps on Etsy - Treasury lists

Recently I have been obsessed with lamps. Sourcing the materials for the lamps (vintage 1960s and 1970s), making the lamps, listing them in my Hatome shop on Etsy, editing the descriptions, then editing again. My husband has been laughing at me.... But we shall persevere....

Here is the next lamp, it has original 1960s/70s white ceramic base with a pattern of brown lines. I re-covered the lampshade with a 1960s/70s vintage yellow and brown cotton fabric depicting a pattern of honeycomb and flowers.


Here is the detail of the lamp:


While doing a lot of research of how other people do things on Etsy, I discovered 'Treasury lists'. If you are unfamiliar with this term, Treasury lists are basically your private collections of 16 images of products from Etsy shops, under your chosen name. How you curate the Treasury list is up to you, but it is advised not to promote your own products (some people are cheating here), not to place 2 pictures from the same seller and "spread the love".

My first 2 Treasury lists were done completely following the rules. I collected some images according to the colors and moods. I enjoyed this very much and it reminded me that I am a graphic designer by profession. Then I had a thought that I should be putting together images that are somehow related to the product I am trying to sell: vintage 1960s lamps. And I created the treasury titled: Modern Vintage Home. I admit I placed the picture of one of my lamps there, it was in such a good company...

Treasury lists are a great way to connect to your Etsy community and they help to promote your own products too. If you want to see my 3 Treasury lists, go to Hatome shop on Etsy, click on 'Profile' under my name, and you will see the 'Treasury Lists'.


Best wishes
Yolanta
Share/Bookmark

Monday, 14 November 2011

My new Hatome shop

At last! My Hatome shop on Etsy is opened.


It is just the beginning, only 3 products are for sale in my little shop, but I keep on producing them and the shop will grow. I sell funky upcycled lamps and cushions with 1950s/60s/70s flavor.


I am passionate about 1950s, 1960s and 1970s designs and I use vintage fabrics or new fabrics with distinctive vintage look. I am also passionate about recycling, upcycling and reusing available materials.


Apart from selling ready made products I will accept commissions. If someone would like me to make a lamp or a cushion using their own favorite fabric - they can contact me to discuss the details.


Please visit my new Hatome shop on Etsy. I would be grateful for your feedback.

Yolanta
Share/Bookmark

Saturday, 8 October 2011

How to upcycle the lamp


I have just finished upcycling this lamp and I will share with you how I did it.

On my usual treasure hunt in the local charity shops I found a little lamp with an interesting base and a vintage tea towel, probably from the sixties. I liked the boldness of the patterns and thought I could use this fabric for a lamp shade.

The existing lampshade was covered with some sort of artificial suede which was quite opaque so I stripped it off using the pliers, leaving the plastic layer in place. If the lampshade you are using is made from a white or light colored fabric, which is letting the light through, you can leave in on and glue your chosen fabric on top of it. 


After deciding which part of the tea towel I am going to use, I put the lampshade sideways on top of the fabric and cut a strip of fabric which was about 2cm wider on each side of the lampshade.
 

I wrapped the strip of fabric around the lampshade. The length of my fabric strip was too short to cover the lampshade so I cut an additional piece from the tea towel to cover the gap. I arranged the fabric pieces on the lampshade and made sure that when the fabric overlapped, only the finished edges of the pieces were visible.

Now I had all the things I needed for upcycling the lampshade, including a strong PVA glue and a binding tape which I would use for the top and bottom edges of the lampshade:


After spreading the fabric face down on a clean protective surface I applied the PVC glue. Avoid using a newspaper as the base protection because the print may transfer on to the moist fabric.
Next I wrapped the fabric carefully along the bottom edge of the lampshade and gently pressed the fabric to the lampshade while forming several folds to accommodate the narrower top of the lampshade. I kept on pressing down the fabric and smoothing the surface and then I left the lampshade to dry. 


After the lampshade had dried out, I cut off the excess fabric along the top and bottom edges. I applied the glue to the binding tape and glued it to the top and bottom edges of the lampshade. 


Here is the detail:


After cleaning the base of the lamp with white spirit, I mixed artists oil paint to match one of the colors in the fabric's pattern and painted part of the lamp base with it. I left the base to dry. 


After several days the lamp base was dry and I added the lampshade to it. The lamp is now ready. Here is the back view:


Happy lamp upcycling.

Yolanta


Share/Bookmark