Showing posts with label Upcycling Projects. Show all posts

Wednesday, 24 September 2014

Ceramic floor and wall ideas

I recently visited Poland again and my friends took me to a wonderful place in the countryside close to Lodz, in a village called Bukowiec. This is where, in a large country house, the ONJATY Association is located. ONJATY is a non-governmental and non-profit organization created in 1995 in order to help children and their families. They give a lot of artistic workshops there. They include pottery, hand-made paper making, felting wool, painting, botanical illustration, upcycled clothing and ecological education.

The founder, Jolanta Rozycka, showed me the house and I could not resist taking a few photos of the ceramic floors and walls. They were all created by a ceramic artist and painter Piotr Klemens Borzecki.


Looking at this beautiful floor I got really inspired and decided to attempt doing something similar in my bathroom. Watch this space.


For more information about the ONJATY association click here.


Share/Bookmark

Thursday, 27 February 2014

The Montage - Art Gallery, Coffee Shop and Vintage Store

About 9 years ago I used to live in Forest Hill, a South East district of London, with the postcode SE23. While I was living in a small apartment in a Victorian house, Forest Hill, although an affluent area in the nineteenth century, was then still quite neglected "up and coming" area, with just a few independent shops, a couple of not so interesting coffee shops and a new branch of Sainsbury supermarket (not counting the magnificent Horniman Museum and Gardens of course).

But the area was full of artists. And it didn't take long for the creative and enterprising spirit to assert itself, in the form of new art galleries, art cafes, and designer and vintage shops. Well established Havelock Walk Studios have been already there for many years, but now the whole area is buzzing with creative activity.

The Montage arrived on the scene last year, after a group of Polish artists got a lease on the dilapidated house and spent several months renovating it. And they did it in a true spirit of environmental friendliness. The place is the upcycling galore!


The Montage is an Art Gallery upstairs, and a Coffee Shop / Gallery / Vintage Store downstairs. It is a very nice combination. The owners' passion for art and all things old shows in every corner.  


The coffee shop was recently extended into the back garden. The old doors are not for sale, but almost everything else is.


The Montage is a very children friendly place. There is a room downstairs, full of toys, where kids can play, while parents catch up with friends over coffee and cake.


And the cakes are delicious! As a person with a wheat intolerance, I could even find several yummy options for myself.


The paintings seen on the walls here are by Agnieszka Handzel and Pawel Wasek.
For more information on The Montage click here.


Share/Bookmark

Sunday, 24 February 2013

How to sew a cushion cover with a concealed zipper

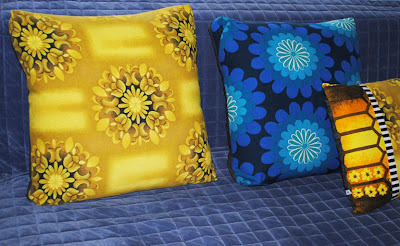
Today I will tell you how to sew a simple cushion cover with a neatly concealed zipper. I made my cushion quite large, as I needed it for our large sofa bed, but you can make it any size you want.


To make this cushion you will need a cushion filler pad and some fabric. I made it using two different vintage fabrics. You will also need the zipper. Measure your filler pad across from seem to seem and add 2.5cm (1") to it. This will be your measurement for cutting the square of fabric for the top of the cushion. For example your pad is 22" from seem to seem, so your fabric square will measure 23" x 23"cm on each side.

The zipper will be in the middle of the back of the cushion so you need to cut 2 pieces of fabric for the back. To get the measurements for the back pieces, add 5cm (2") to the front piece measurement and divide it by 2 (23"+2" = 25"; 25":2 = 12.5"). Your 2 back pieces will measure 12.5" x 23" each.

The zipper should be about 5cm (2") or more shorter than the measurement from seem to seem of the filler pad.


Machine sew one of the long edges in both back pieces with zigzag stitch. To make it easier to sew the zipper in, first fold and iron the edges on one side. Fold one piece 1.5cm (0.5") from the edge of the fabric and the other 2.5cm (1") from the edge.


Take the piece with narrower fold and using the pins secure the zipper in place, starting about 1.5" from top edge, making sure the zipper is positioned the same distance away from top and bottom edges of the fabric.


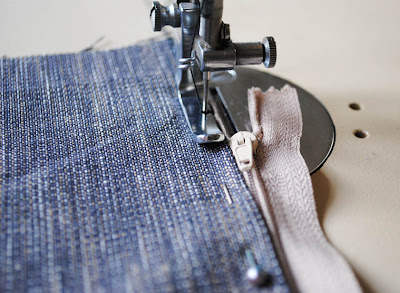
Change the foot in your sewing machine to a zipper foot and sew in one side the zipper.


Position the other piece of fabric (with wider fold) over the zipper so that the two fabric pieces overlap by about 1 cm (less that half inch) and secure with pins. Mark 2 places where the soft zipper ends are and secure with pins like in the photo:


Start sewing in the other side of the zipper. When you get to the marker across, sew this place 3 times, to make the stitch hold the zipper strongly in place. Continue sewing along the pins, removing them just before you get to them with machine needle.


When you reach the end side of the zipper, repeat the triple stitch action where the pin marker is and continue sewing to the end.


This is what the zipper should look like:


Place the back piece of cushion cover on top of the front piece with good sides facing each another. Cut away any uneven edges and secure 2 pieces together with pins. Make sure you zipper is unzipped enough for you to insert your hand inside. You will need it to fold the cushion cover inside out later on.


Change the foot  in your sewing machine to standard one. Sew 2 pieces of cushion cover together 1.5cm (over 0.5") from the edges and finish off with zigzag stitch.


You can also fold the corners and sew them across, but it is optional.


Fold the cushion cover inside out and iron the stitches. Insert the filler pad. Your cushion is ready.


Happy sewing!


Share/Bookmark

Sunday, 15 July 2012

How to sew a tote bag using leftover fabric

If you have bits of fabric left, you can use them to make a simple tote bag. The fabric suitable for the bag has to be quite strong. I used two contrasting cotton curtain fabrics to make this bag, but you can use whatever fabric you have.


Cut 4 strips of fabric: 2 x 29 inches (5 x 74 cm) for the handles, 2 strips of each kind of fabric.
Also cut 2 pieces the fabric for the body of the bag: 12 x 14 inches (30.5 x 35.5 cm) each.
Finally cut one strip of contrasting fabric: 4.5 x 40.5 inches (11.5 x 102 cm) for the sides and bottom of the bag.


To make the handle, pin together 2 strips of fabric (of 2 different kinds of fabric), remembering to place the fabrics with the right sides facing each other.
Sew together 2 strips of fabric lengthwise (about 1/4 inch = 1 cm from the edge), then turn the piece inside out, fold it and pin the edges, folding the edges inwards as you pin them. Sew along the edges of the handle.


Repeat the action to make the second handle.
Cut off the corners (on one side) of the 2 pieces of fabric for the main body of the bag. Make them rounded as it is much easier to sew along rounded corners.


Pin the wide strip of fabric along 3 sides of the bag and sew the pieces together. To make the bag stronger, you can sew along the edge twice.


Use zigzag stitch along the very edges to make them neat. Repeat the action with the other side of the bag.


Flip the bag inside out. Fold the top edge of the bag inwards twice and secure with pins.


Sew along the edge of the bag.


Insert the handles into the bag and pin them to the bag in 4 places.
Sew the handles to the bag following the shape of a rectangle with a cross inside:


Your bag is ready to use:


Happy bag making!

Yolanta


Share/Bookmark

Wednesday, 19 October 2011

Making Frida Kahlo style blouse

Frida Kahlo, the Mexican painter, captured the imagination with her beautiful paintings, her amazing and tragic life story and her colorful sense of style. Her home, her garden, her pet monkeys and other pets, and most of all, her traditional Mexican outfits still inspire many of us, especially artistically inclined women.


I always admired her beautiful blouses and few years ago I made myself a Frida Kahlo blouse. Actually, I was dressed as Frida Kahlo for a New Year's Eve party. The theme of the party was: "Famous deceased person". So I choose to dress as Frida and I made this blouse:


I wore it with a heavy red necklace, heavy earrings and a long skirt which I picked up in a charity shop. I tied my hair up with red ribbons, Frida's style, and painted my brows so that they met in the middle. The outfit was a great success and I had lots of fun!

The blouse was made out of an old simple blouse, a few embroidered pieces of another old blouse, and some decorative haberdashery.


This is the back view:


If you would like to make something similar, It is very easy to do. You can use what you have at home, just think creatively. For inspiration, see Frida Kahlo paintings and photographs. If you would rather buy a ready made Frida blouse, I recommend an on-line shop where you can do it by clicking here.


Happy blouse making ;)
Yolanta
Share/Bookmark

Saturday, 8 October 2011

How to upcycle the lamp


I have just finished upcycling this lamp and I will share with you how I did it.

On my usual treasure hunt in the local charity shops I found a little lamp with an interesting base and a vintage tea towel, probably from the sixties. I liked the boldness of the patterns and thought I could use this fabric for a lamp shade.

The existing lampshade was covered with some sort of artificial suede which was quite opaque so I stripped it off using the pliers, leaving the plastic layer in place. If the lampshade you are using is made from a white or light colored fabric, which is letting the light through, you can leave in on and glue your chosen fabric on top of it. 


After deciding which part of the tea towel I am going to use, I put the lampshade sideways on top of the fabric and cut a strip of fabric which was about 2cm wider on each side of the lampshade.
 

I wrapped the strip of fabric around the lampshade. The length of my fabric strip was too short to cover the lampshade so I cut an additional piece from the tea towel to cover the gap. I arranged the fabric pieces on the lampshade and made sure that when the fabric overlapped, only the finished edges of the pieces were visible.

Now I had all the things I needed for upcycling the lampshade, including a strong PVA glue and a binding tape which I would use for the top and bottom edges of the lampshade:


After spreading the fabric face down on a clean protective surface I applied the PVC glue. Avoid using a newspaper as the base protection because the print may transfer on to the moist fabric.
Next I wrapped the fabric carefully along the bottom edge of the lampshade and gently pressed the fabric to the lampshade while forming several folds to accommodate the narrower top of the lampshade. I kept on pressing down the fabric and smoothing the surface and then I left the lampshade to dry. 


After the lampshade had dried out, I cut off the excess fabric along the top and bottom edges. I applied the glue to the binding tape and glued it to the top and bottom edges of the lampshade. 


Here is the detail:


After cleaning the base of the lamp with white spirit, I mixed artists oil paint to match one of the colors in the fabric's pattern and painted part of the lamp base with it. I left the base to dry. 


After several days the lamp base was dry and I added the lampshade to it. The lamp is now ready. Here is the back view:


Happy lamp upcycling.

Yolanta


Share/Bookmark

Saturday, 3 September 2011

How to make a Driftwood Frame

Some time ago, I collected some driftwood at the beach in Folkestone (the best time to do it is after the storm, when the beach is full of treasures thrown out by the sea). Today I will describe how to make this simple Driftwood Frame:


Apart from the driftwood, I used a small framed mirror which I bought at a charity shop. You can use any frame which is flat and wide enough to provide a space for the driftwood to be glued to it. I also used a glue gun, a piece of fine sand paper and small pair of pliers.


First I sanded the frame, taking care to sand the edges nicely without scratching the mirror in the process. I wiped the frame clean with a cloth.


Then I started to arrange the flat pieces of driftwood on the frame. Whenever a piece of driftwood was too long, I broke off the end with the pliers and sanded it down. I did not glue the pieces to the frame yet.


When I had the frame covered with the flat pieces of driftwood, I carefully glued the driftwood to the frame with the glue gun. Be careful not to burn your fingers with the hot glue (like I did).


With all the flat pieces of driftwood glued to the frame, I arranged several more on top to cover the gaps and to make the driftwood frame look more interesting. I then glued the last pieces to the first layer of driftwood. Now the driftwood frame is ready:


Happy frame making :)

Yolanta
Share/Bookmark