Showing posts with label Sewing. Show all posts

Sunday, 24 February 2013

How to sew a cushion cover with a concealed zipper

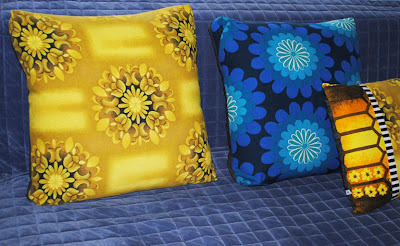
Today I will tell you how to sew a simple cushion cover with a neatly concealed zipper. I made my cushion quite large, as I needed it for our large sofa bed, but you can make it any size you want.


To make this cushion you will need a cushion filler pad and some fabric. I made it using two different vintage fabrics. You will also need the zipper. Measure your filler pad across from seem to seem and add 2.5cm (1") to it. This will be your measurement for cutting the square of fabric for the top of the cushion. For example your pad is 22" from seem to seem, so your fabric square will measure 23" x 23"cm on each side.

The zipper will be in the middle of the back of the cushion so you need to cut 2 pieces of fabric for the back. To get the measurements for the back pieces, add 5cm (2") to the front piece measurement and divide it by 2 (23"+2" = 25"; 25":2 = 12.5"). Your 2 back pieces will measure 12.5" x 23" each.

The zipper should be about 5cm (2") or more shorter than the measurement from seem to seem of the filler pad.


Machine sew one of the long edges in both back pieces with zigzag stitch. To make it easier to sew the zipper in, first fold and iron the edges on one side. Fold one piece 1.5cm (0.5") from the edge of the fabric and the other 2.5cm (1") from the edge.


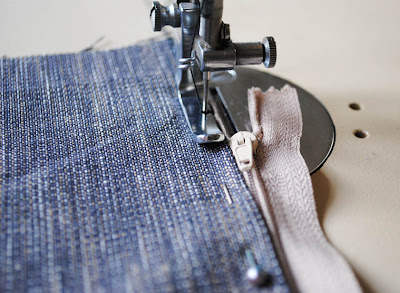
Take the piece with narrower fold and using the pins secure the zipper in place, starting about 1.5" from top edge, making sure the zipper is positioned the same distance away from top and bottom edges of the fabric.


Change the foot in your sewing machine to a zipper foot and sew in one side the zipper.


Position the other piece of fabric (with wider fold) over the zipper so that the two fabric pieces overlap by about 1 cm (less that half inch) and secure with pins. Mark 2 places where the soft zipper ends are and secure with pins like in the photo:


Start sewing in the other side of the zipper. When you get to the marker across, sew this place 3 times, to make the stitch hold the zipper strongly in place. Continue sewing along the pins, removing them just before you get to them with machine needle.


When you reach the end side of the zipper, repeat the triple stitch action where the pin marker is and continue sewing to the end.


This is what the zipper should look like:


Place the back piece of cushion cover on top of the front piece with good sides facing each another. Cut away any uneven edges and secure 2 pieces together with pins. Make sure you zipper is unzipped enough for you to insert your hand inside. You will need it to fold the cushion cover inside out later on.


Change the foot  in your sewing machine to standard one. Sew 2 pieces of cushion cover together 1.5cm (over 0.5") from the edges and finish off with zigzag stitch.


You can also fold the corners and sew them across, but it is optional.


Fold the cushion cover inside out and iron the stitches. Insert the filler pad. Your cushion is ready.


Happy sewing!


Share/Bookmark

Thursday, 15 November 2012

Hatome Cushions with Mid Century feel

My little Hatome brand is growing!
Here are a few new cushions I have made using Mid Century fabrics which I have been collecting for a long time. I am finally putting them to good use.


This one has a fairytale theme and it would be also suitable for a children's room:


I used some vintage and some new Japanese fabric to sew this one:


The backs of the cushions are made with a contrasting colored thick cotton fabric, with a neatly concealed zipper.


Te cushion covers can be machine washed at the temperature of 30 degrees C.
Here is the link to Hatome shop on Folksy (UK online marketplace for arts and crafts):

www.hatome.co.uk


Share/Bookmark

Sunday, 15 July 2012

How to sew a tote bag using leftover fabric

If you have bits of fabric left, you can use them to make a simple tote bag. The fabric suitable for the bag has to be quite strong. I used two contrasting cotton curtain fabrics to make this bag, but you can use whatever fabric you have.


Cut 4 strips of fabric: 2 x 29 inches (5 x 74 cm) for the handles, 2 strips of each kind of fabric.
Also cut 2 pieces the fabric for the body of the bag: 12 x 14 inches (30.5 x 35.5 cm) each.
Finally cut one strip of contrasting fabric: 4.5 x 40.5 inches (11.5 x 102 cm) for the sides and bottom of the bag.


To make the handle, pin together 2 strips of fabric (of 2 different kinds of fabric), remembering to place the fabrics with the right sides facing each other.
Sew together 2 strips of fabric lengthwise (about 1/4 inch = 1 cm from the edge), then turn the piece inside out, fold it and pin the edges, folding the edges inwards as you pin them. Sew along the edges of the handle.


Repeat the action to make the second handle.
Cut off the corners (on one side) of the 2 pieces of fabric for the main body of the bag. Make them rounded as it is much easier to sew along rounded corners.


Pin the wide strip of fabric along 3 sides of the bag and sew the pieces together. To make the bag stronger, you can sew along the edge twice.


Use zigzag stitch along the very edges to make them neat. Repeat the action with the other side of the bag.


Flip the bag inside out. Fold the top edge of the bag inwards twice and secure with pins.


Sew along the edge of the bag.


Insert the handles into the bag and pin them to the bag in 4 places.
Sew the handles to the bag following the shape of a rectangle with a cross inside:


Your bag is ready to use:


Happy bag making!

Yolanta


Share/Bookmark

Monday, 21 May 2012

How to make a felt heart stuffed with cotton or lavender

I have been making a lot of felt hearts lately. They are easy to make and you can make them in the evenings, while watching TV or listening to the music. I find the process of making them quite meditative.


This is what you need to make the heart: some felt fabric cut into two heart shapes, sequins or other decorative beads, thin thread and thin needle for sawing the beads onto the felt, embroidery thread and needle for sewing two sides of the heart together, and cotton for stuffing the hearts. You can also use dried lavender flowers as heart's filler - then the heart can be used in your wardrobe as moths' repellent.


Begin by sawing the beads onto one heart shape.


This is what the thread can look on the other side:


Put one heart shape on top of another and sew them together using the embroidery thread of contrasting color. Use the blanket stitch, as shown below. Leave the gap of about 3 cm (just over 1 inch) for filling the heart with cotton.


Fill the heart with cotton or dried lavender (I used both) and finish the sewing.


These hearts have a variety of uses. They can be placed in the wardrobe, hung on the Christmas tree or just displayed in a group.


Happy heart making :)

Yolanta


Share/Bookmark

Wednesday, 19 October 2011

Making Frida Kahlo style blouse

Frida Kahlo, the Mexican painter, captured the imagination with her beautiful paintings, her amazing and tragic life story and her colorful sense of style. Her home, her garden, her pet monkeys and other pets, and most of all, her traditional Mexican outfits still inspire many of us, especially artistically inclined women.


I always admired her beautiful blouses and few years ago I made myself a Frida Kahlo blouse. Actually, I was dressed as Frida Kahlo for a New Year's Eve party. The theme of the party was: "Famous deceased person". So I choose to dress as Frida and I made this blouse:


I wore it with a heavy red necklace, heavy earrings and a long skirt which I picked up in a charity shop. I tied my hair up with red ribbons, Frida's style, and painted my brows so that they met in the middle. The outfit was a great success and I had lots of fun!

The blouse was made out of an old simple blouse, a few embroidered pieces of another old blouse, and some decorative haberdashery.


This is the back view:


If you would like to make something similar, It is very easy to do. You can use what you have at home, just think creatively. For inspiration, see Frida Kahlo paintings and photographs. If you would rather buy a ready made Frida blouse, I recommend an on-line shop where you can do it by clicking here.


Happy blouse making ;)
Yolanta
Share/Bookmark

Tuesday, 19 July 2011

How to make a simple patchwork bunting

In preparation for our party in the forest, I have been making the bunting. I wanted to make something different from the usual triangular shape of the flags and I decided to make a simple square patchwork bunting using the leftover cotton fabric.


But first I looked at the pieces of fabric I had available and gathered them into three groups, with the intention of making three different kinds of bunting, starting from the simple patchwork one.


I decided to use pink, red and beige fabric for my patchwork bunting. The flags were to be made with the simple squares on one side and, on the other side, the squares made with the triangles sewn together.

I cut the first 15 x 15cm (6" x 6") square, then I folded the fabric several times, using the first square for measurement (you can make a paper square first if you prefer). I cut the fabric along the edges of the square, cutting through several layers of fabric to save time.


Next I cut the slightly bigger, 16.5 x 16.5cm squares and cut them in half along the diagonal to make the triangles. These triangles will be sewn together in pairs of contrasting colors and they will form the squares.


I continued to cut the smaller squares and the triangles (which were cut out of the bigger squares), using different colored fabric, making sure that in the end I had twice as many triangles as the squares.


I also cut the strips of pink fabric (4cm wide) and sewed them together to make a long tape (about 15 meters long) for inserting the bunting flags into it.


I started to sew the pairs of triangles together to form the squares.


Then I ironed the newly formed squares. They were now the same size as the smaller squares, about 15 x 15cm.


I paired the patchwork squares with the simple squares ...


... and I sewed the pairs together on three sides, leaving one side open.


After cutting the excess of fabric from the edges, I clipped the corners slightly in order to make it easier to turn the pieces inside out.


And after turning all the pieces inside out, I sewed them close to the edges on three sides.


I placed all the pieces on the table, grouping them according to the colors, and I decided on the order of how they were going to be sewn into the tape. Then I sewed them into the pink strip, placing the strip on top of the open side of the plain square (not the patchwork one), allowing the space of about 10cm between each square.


I finished by folding the edges of the strip and sewing the strip on top of the patchwork side of the squares.


After I have ironed it, the patchwork bunting is now ready:


Happy making :)

Yolanta
Share/Bookmark