Showing posts with label Children crafts. Show all posts

Wednesday, 24 September 2014

Ceramic floor and wall ideas

I recently visited Poland again and my friends took me to a wonderful place in the countryside close to Lodz, in a village called Bukowiec. This is where, in a large country house, the ONJATY Association is located. ONJATY is a non-governmental and non-profit organization created in 1995 in order to help children and their families. They give a lot of artistic workshops there. They include pottery, hand-made paper making, felting wool, painting, botanical illustration, upcycled clothing and ecological education.

The founder, Jolanta Rozycka, showed me the house and I could not resist taking a few photos of the ceramic floors and walls. They were all created by a ceramic artist and painter Piotr Klemens Borzecki.


Looking at this beautiful floor I got really inspired and decided to attempt doing something similar in my bathroom. Watch this space.


For more information about the ONJATY association click here.


Share/Bookmark

Friday, 24 January 2014

Indygo Ceramic Studio in Lodz

Another trip to Lodz (Poland) and another visit to the Off Piotrkowska center, the cluster of creative businesses located in a converted textile factory right in the centre of the city. One of the beautiful bright spaces there is occupied by Indygo Ceramic Studio, set up a few years ago by an artist and teacher Dominika Karczewska.

It is quite an achievement to successfully launch and sustain a creative business like this in our difficult times. I am full of admiration for small art and craft studios that manage to stay in business and flourish.


Indygo does this by coming up with new ideas of how to be useful and relevant in the local community. Apart from her own creative work, Dominika runs regular ceramic workshops for children and adults, linking in with local schools and charities.


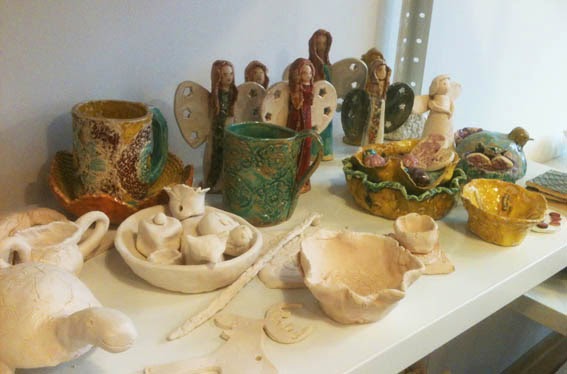
The classes are fun and they are well attended. Children love working with clay! Some of the young students' work on the shelves is waiting to be glazed and placed in the beautiful new kiln.


This bowl is a nice example of Indygo's own production. I just love this color combination:


Dominika incorporates some of the ceramic elements into her jewellery pieces.


Next time you are in Lodz, visit Indygo in the Off Piotrkowska center. You can join Indygo's Facebook page for more information here.

For the Off Piotrkowska Facebook page click here.


Share/Bookmark

Wednesday, 27 March 2013

How to decorate Easter Eggs using leaves and onion skins

I have been wanting to try this method of Easter eggs decoration since had I read about it in a magazine some time ago, so today I decided to give it a go.


First I covered some onion skins with water and boiled them for about 20 minutes to prepare the dye, then I removed the skins.


I hard boiled the eggs. Then I collected some leaves from the garden for making the patterns. You can substitute the leaves for lace, pieces of string, anything you like. I also took a pair of old tights and cut them into squares of about 15 x 15cm (6 x 6").


I put the leave on top of the egg and tied a piece of tights over it.


After preparing all the eggs this way, I put them all into the hot dye for about 3 hours.


When the eggs were nice dark red color I took them out to dry. I dipped a tissue in vegetable oil and polished the eggs to give them a shine.


Happy Easter everyone!

Share/Bookmark

Monday, 21 May 2012

How to make a felt heart stuffed with cotton or lavender

I have been making a lot of felt hearts lately. They are easy to make and you can make them in the evenings, while watching TV or listening to the music. I find the process of making them quite meditative.


This is what you need to make the heart: some felt fabric cut into two heart shapes, sequins or other decorative beads, thin thread and thin needle for sawing the beads onto the felt, embroidery thread and needle for sewing two sides of the heart together, and cotton for stuffing the hearts. You can also use dried lavender flowers as heart's filler - then the heart can be used in your wardrobe as moths' repellent.


Begin by sawing the beads onto one heart shape.


This is what the thread can look on the other side:


Put one heart shape on top of another and sew them together using the embroidery thread of contrasting color. Use the blanket stitch, as shown below. Leave the gap of about 3 cm (just over 1 inch) for filling the heart with cotton.


Fill the heart with cotton or dried lavender (I used both) and finish the sewing.


These hearts have a variety of uses. They can be placed in the wardrobe, hung on the Christmas tree or just displayed in a group.


Happy heart making :)

Yolanta


Share/Bookmark

Thursday, 1 December 2011

How to make a star out of paper strips

It's the 1st of December already and we are thinking about Christmas and start living in anticipation....
although this year I have no idea where we will spend our holiday as we are hoping to move home but it hasn't been confirmed ....

Today I will tell you about something that I used to make for Christmas with my father when I was a child: paper stars. They are quite easy to make.


All you need is some paper strips, about 1-1.5 cm (half an inch) wide and about 30cm long (12-13") or wider and longer for bigger stars. You can buy them ready cut in craft shops. To make one star take 4 paper strips and fold them in half.


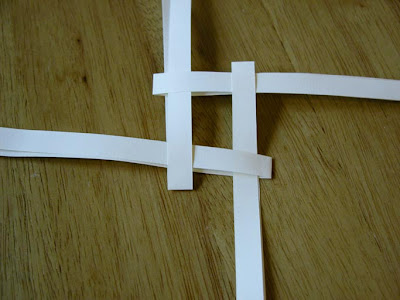
Arrange them like this, so they insert into each other:


Now pull the strips' ends in 4 directions to make it tight. Now you have 4 double paper strips pointing in 4 directions. What you need is 8 single strips, 2 on each side. So you start with folding 1 single strip on top of the square.


Go around the square anti clockwise and continue folding single strips. When you get to the 4th strip pull it under the first strip and tighten up. It helps to fold the ends of the strips first, to make it easier to insert them and pull them through.


Now start folding the strip like this:


Fold it again (inwards) and pull through under the strip in the square:


It should look like this:


Then go around the square clockwise and repeat the same action on 3 remaining sides. When you have finished doing this the piece should look like this:


Turn the piece upside down and repeat the last action, so you end up with a flat 8 pointed star and the paper strips sticking out of the middle on both sides:


Now you start making this star 3-dimensional. Take 1 strip, fold it under and over like in the picture, insert it under other strip in the middle and pull through so it comes out of one of the 8 points of the star.


The first of the middle points of the star should look like this when finished:


Continue around the star anti clockwise, until you have 4 middle points:


Turn the piece over and repeat the same action on the other side:


Cut the remaining paper strips off. Your star is ready. You can use these stars to decorate a Christmas tree or in any way you can think of. I think they look pretty good just as a table decoration:


Happy star making.

Yolanta x
Share/Bookmark

Saturday, 5 November 2011

How to make an easy jar opener - gripper

A few years ago, while visiting my son and daughter-in-law in Virginia, she gave me something very useful: a jar opener/gripper, made of rubber with crocheted edges. I have been using it ever since. It really makes jar opening easy-peasy. I wanted to buy similar jar openers for my mum and sister, but I could not find them anywhere in the shops.


Then one day I saw an anti-slip mat in a local home supplies shop, and it dawned on me: I can make the jar openers myself! They are easy to make and they can be a perfect Christmas stocking filler too. Here is what you need: An anti-slip mat, some yarn and a crochet hook.


Cut the square off the mat, about 14cm x 14cm (6" x 6"). Then work around the edge of the square with the crochet, using a double crochet stitch and inserting the crochet hook in the holes on the edges of the mat.


When you come to the corner add three chain loops and continue with a double crochet stitch.


After crocheting around the whole square, work the second row with a double crochet stitch using yarn of a contrasting color. In the corners of the second row add 3 loops, then 1 double crochet stitch, then again 3 more loops. The finished product should look like this:


Try the jar opener on the jar, it will work perfectly well.


Happy crocheting :)

Yolanta
Share/Bookmark

Wednesday, 21 September 2011

Making chestnut animals

Yesterday we had some bad news about our house purchase and it made me feel quite upset, then ... I felt somehow detached. I went for a walk. I wanted to be in nature. I started collecting  chestnuts and leaves, and I remembered how, as children, my sister and I used to make little toys with them. With this memory, I was transformed into the state of contentment, a feeling so familiar and at the same time, so rare. As adults we have glimpses into the state of child-like innocence, when we feel unconditional joy of being alive. This happens when we are exactly in the present moment, not thinking about the future or the past.
 

So I decided to make some chestnut animals. I used chestnuts to make animals' bodies and heads, and  matchsticks to make their legs, necks and tails.
 

I pierced the chestnut with small sharp scissors to insert matchsticks.
 

I made two grown-ups and two children:
 

And here is one animal baby going to sleep in a bed made out of a match box, lined with soft leaves:
 

This post is dedicated to my little granddaughters Savanka and Zoe who live in the USA.   

Happy chestnut animal making :)  
Yolanta
Share/Bookmark