Showing posts with label Party. Show all posts

Wednesday, 19 October 2011

Making Frida Kahlo style blouse

Frida Kahlo, the Mexican painter, captured the imagination with her beautiful paintings, her amazing and tragic life story and her colorful sense of style. Her home, her garden, her pet monkeys and other pets, and most of all, her traditional Mexican outfits still inspire many of us, especially artistically inclined women.


I always admired her beautiful blouses and few years ago I made myself a Frida Kahlo blouse. Actually, I was dressed as Frida Kahlo for a New Year's Eve party. The theme of the party was: "Famous deceased person". So I choose to dress as Frida and I made this blouse:


I wore it with a heavy red necklace, heavy earrings and a long skirt which I picked up in a charity shop. I tied my hair up with red ribbons, Frida's style, and painted my brows so that they met in the middle. The outfit was a great success and I had lots of fun!

The blouse was made out of an old simple blouse, a few embroidered pieces of another old blouse, and some decorative haberdashery.


This is the back view:


If you would like to make something similar, It is very easy to do. You can use what you have at home, just think creatively. For inspiration, see Frida Kahlo paintings and photographs. If you would rather buy a ready made Frida blouse, I recommend an on-line shop where you can do it by clicking here.


Happy blouse making ;)
Yolanta
Share/Bookmark

Thursday, 18 August 2011

Garden party in the forest

Our post-wedding garden party in the forest happened as planned last Saturday, in Poland.
About 40 guests arrived despite the rainy start to the day. After the rain stopped I finally hung the bunting decorations I have been preparing for this occasion.


Luckily the rain stayed away for the rest of the evening. Children (and adults) could play outside.
This little dolls house was a nice decoration too.


To decorate the tables we used the glass lanterns which we prepared in June. They were filled with Citronella candles to discourage the mosquitoes.


We also used Rowan tree branches to decorate the tables. Here you can see them, filling little yellow buckets.

After the snacks we served many different salads (prepared by my sister Gosia and me) and the main dish: Bigos, which is a delicious Polish specialty. I will write about Bigos separately, it deserves it.


My friends and I:


And finally: the Wedding Cake (actually, there were 3 of them), delivered to the table by my niece, Marcelina. She also made a beautiful plum cake.


It was a good party. Pity that some of the family members and friends could not be there. Our family lives in many different countries...

I hope you enjoyed this little story.
Yolanta :)


Share/Bookmark

Tuesday, 19 July 2011

How to make a simple patchwork bunting

In preparation for our party in the forest, I have been making the bunting. I wanted to make something different from the usual triangular shape of the flags and I decided to make a simple square patchwork bunting using the leftover cotton fabric.


But first I looked at the pieces of fabric I had available and gathered them into three groups, with the intention of making three different kinds of bunting, starting from the simple patchwork one.


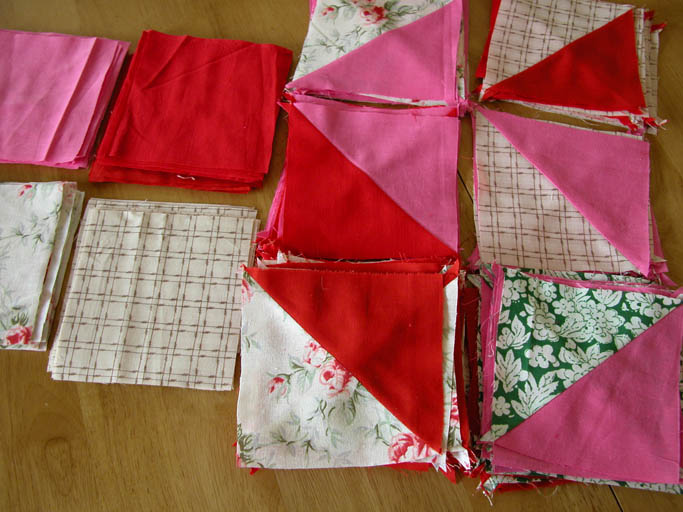
I decided to use pink, red and beige fabric for my patchwork bunting. The flags were to be made with the simple squares on one side and, on the other side, the squares made with the triangles sewn together.

I cut the first 15 x 15cm (6" x 6") square, then I folded the fabric several times, using the first square for measurement (you can make a paper square first if you prefer). I cut the fabric along the edges of the square, cutting through several layers of fabric to save time.


Next I cut the slightly bigger, 16.5 x 16.5cm squares and cut them in half along the diagonal to make the triangles. These triangles will be sewn together in pairs of contrasting colors and they will form the squares.


I continued to cut the smaller squares and the triangles (which were cut out of the bigger squares), using different colored fabric, making sure that in the end I had twice as many triangles as the squares.


I also cut the strips of pink fabric (4cm wide) and sewed them together to make a long tape (about 15 meters long) for inserting the bunting flags into it.


I started to sew the pairs of triangles together to form the squares.


Then I ironed the newly formed squares. They were now the same size as the smaller squares, about 15 x 15cm.


I paired the patchwork squares with the simple squares ...


... and I sewed the pairs together on three sides, leaving one side open.


After cutting the excess of fabric from the edges, I clipped the corners slightly in order to make it easier to turn the pieces inside out.


And after turning all the pieces inside out, I sewed them close to the edges on three sides.


I placed all the pieces on the table, grouping them according to the colors, and I decided on the order of how they were going to be sewn into the tape. Then I sewed them into the pink strip, placing the strip on top of the open side of the plain square (not the patchwork one), allowing the space of about 10cm between each square.


I finished by folding the edges of the strip and sewing the strip on top of the patchwork side of the squares.


After I have ironed it, the patchwork bunting is now ready:


Happy making :)

Yolanta
Share/Bookmark

Sunday, 26 June 2011

Painting glass lanterns

I haven't been writing on my blog for a few weeks now. I have been away. While visiting my mother in Poland, I managed to spend a few days in the forest, where our Summer house is located.


As it was our first visit to the Summer house this year, my sister and I got to work. I was cleaning and airing the little house and she cut the grass and pruned the bushes. We also collected some strawberries and had them with tea.


Life can be blissfully lazy on dzialka (that's what we call it in Polish, but the word actually means allotment). The atmosphere there reminds me of Chekhov's plays. Endless rounds of tea and cake (my aunts and cousins have Summer houses in the same area), reading and talking, yes, mostly talking.


I recently got married to my Mr Partner (in March this year) in London and we decided to have two wedding parties. One in London for my husband's English family and our friends, and the other one in this Summer house, in August, for my Polish family and our Polish friends. So I used my time on dzialka to start the preparations for our party.

I have been collecting glass jars for some time, with the intention of making them into lanterns. I got some glass paints and brushes and asked my sister and niece to help me.


We used the only three colors we had: green, red and turquoise, painting each jar with a single color.


The rough idea was to use some of the lanterns for the tables, some for decorating the porch and some for hanging on the trees. I have no idea what it will look like, the only thing I know is that the party decorations have to be colorful and happy, with the element of surprise.


Here are some of the lanterns we prepared:


and some more:


Later a neighbor came and contributed some designs too. We had a good time. We left the jars outside to dry overnight. In August we will fill them with candles.
I will be writing about other party preparations in my next posts.

See you later
Yolanta
Share/Bookmark

Monday, 24 January 2011

How to make a Party Invitation card

Today I made a personalized Party Invitation Card using the card from the discounted box pack of flower cards.


The bookshop nearby is closing down and although this fact in itself is very sad (it happens so often nowadays), it brought with it some amazing shopping opportunities because now everything sells at 30% of the original price. So I bought a box of 30 flower cards for £2.99.


You can make any kind of personalized cards using this method, like Valentine Cards or Birthday cards. Because I am dreaming of Summer and the green garden, I made a Garden Party Invitation Card.

In order to make this invitation card I used my computer and printer and other things I had at home, like some rubber stamps and star stickers. Use whatever you have.


After deciding on the text of my invitation, I designed it on Mac and printed it on white paper (you can use the colored printing paper). I printed 2 pages: a title text to go on the front of the card and the invitation text to be inserted into the card (I measured the unfolded card and drew a slightly smaller rectangle on Mac in order to fit the text in the space available).


I made the title text using Adobe Illustrator software (by drawing the curved line, turning it into a text path and typing the title on it in Papyrus Regular typeface), but you can just create a straight text line in any typeface in Microsoft Word.

Then I cut the title text out of the printout. The shape of the cutout is up to you - try to use the shape which will complement the image on the front of the card, I used a roundish shape to complement the flowers. I put the title on the front of the card and decorated the front with bits of pink tissue, stamping some birds and tree images on top and adding 2 star stickers.


After cutting the text of the invitation along the rectangle lines, I attached it to the inside of the card with the glue (apply the glue in a few points to half of the card only, so it will close easily) and decorated it with some stamped birds, trees and star stickers.


My garden party invitation is ready. All I need is a bit of Summer.

Happy card making :)
Yolanta

Share/Bookmark