Showing posts with label Christmas. Show all posts

Thursday, 17 December 2015

Merry Christmas and Happy New Year!

I wish you a very relaxing time during the Christmas Holidays. I hope you will be happy, warm and cosy, with your family and friends around you. My family is scattered all over the world, but we will have friends with us.


The year is coming to a close soon and it always puts me in a reflective mood.
I let you in on a little secret. Every year, on the last day of the year, I write about the year that just passed and about the year ahead. I dream and I write down  on paper my desires and hopes for the new year. It makes it somehow more real. There is some truth in the power of positive thinking. When I write, I use the past tense, like it has already happened. This is the trick.

Last year I wrote that I have an art studio in the garden and I am preparing for a solo exhibition in a Museum. Both things became reality in 2015! My warm and cosy studio stands in the garden behind our house (with a 6 meters long glass wall facing North - perfect for painting) and my solo exhibition is coming up in September 2016 in the Nature Museum in Jelenia Gora, Poland.

I hope your dreams will also come true in 2016.
Thank you so much for being a part of my year 2015. I really appreciate it.

Best wishes
Yolanta
Share/Bookmark

Saturday, 15 December 2012

Merry Christmas !

Just a couple of wintery photographs from our frozen garden. Winter has come early to England this year.


Have a Very Happy Christmas everyone! Please visit my blog again in the New Year.

Lots of love
Yolanta


Share/Bookmark

Monday, 26 November 2012

Country Living Christmas Fair in London

I recently visited the Country Living Christmas Fair in London. It is a huge crafts fair organized by Country Living Magazine, which is my favorite periodical.

Every month this magazine takes me on a journey into my dreams.
I read about lovely country cottages and gardens, and people who very often are self employed, often working from their studios. They also write a lot about crafts, which is inspiring.


I took some photos of the stands I particularly liked, but not all of the photos came out nicely so I will show just a few.

Here is some lovely crockery by Material Pleasures. I loved the simplicity and elegance of this display.


And handmade toys by Laura Long:


And vibrant prints by Emma Hardicker:


As always, the fair was a treat. It is invigorating to see all the range of people's creativity. Also, it was good research for me, I took mental notes about the way makers organize their stalls and what display ideas could work for my creative business.

Here is the link to Country Living Fair where you can find more information about their future craft fairs.

http://countrylivingfair.com/


Share/Bookmark

Sunday, 11 November 2012

Living Letters Christmas Cards

Christmas time is fast approaching and I am selling my Christmas cards!
Some time ago, inspired by William Morris fabric designs, I illustrated and produced the range of 12 Christmas Cards. I called the range 'Living Letters' because the cards show various Christmas greetings in the form of living, growing floral letters.


The cards are blank inside, allowing the sender to write a personal message. They measure 5 by 7 inch and they are beautifully printed on a 300gsm silk art paper. They are sold with matching envelopes.


You can buy them in packs of 10 Cards (1 of each of 10 designs) for £5 a pack, and in packs of 5 Cards (5 of the same design) for £3 a pack.

Here is the link to my Living Letters shop on Folksy:
http://folksy.com/shops/LivingLetters


Happy Christmas preparations
Yolanta
Share/Bookmark

Monday, 21 May 2012

How to make a felt heart stuffed with cotton or lavender

I have been making a lot of felt hearts lately. They are easy to make and you can make them in the evenings, while watching TV or listening to the music. I find the process of making them quite meditative.


This is what you need to make the heart: some felt fabric cut into two heart shapes, sequins or other decorative beads, thin thread and thin needle for sawing the beads onto the felt, embroidery thread and needle for sewing two sides of the heart together, and cotton for stuffing the hearts. You can also use dried lavender flowers as heart's filler - then the heart can be used in your wardrobe as moths' repellent.


Begin by sawing the beads onto one heart shape.


This is what the thread can look on the other side:


Put one heart shape on top of another and sew them together using the embroidery thread of contrasting color. Use the blanket stitch, as shown below. Leave the gap of about 3 cm (just over 1 inch) for filling the heart with cotton.


Fill the heart with cotton or dried lavender (I used both) and finish the sewing.


These hearts have a variety of uses. They can be placed in the wardrobe, hung on the Christmas tree or just displayed in a group.


Happy heart making :)

Yolanta


Share/Bookmark

Thursday, 1 December 2011

How to make a star out of paper strips

It's the 1st of December already and we are thinking about Christmas and start living in anticipation....
although this year I have no idea where we will spend our holiday as we are hoping to move home but it hasn't been confirmed ....

Today I will tell you about something that I used to make for Christmas with my father when I was a child: paper stars. They are quite easy to make.


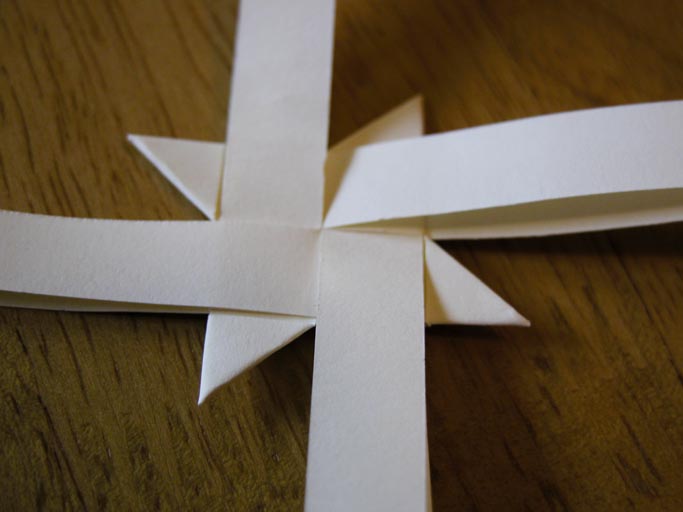
All you need is some paper strips, about 1-1.5 cm (half an inch) wide and about 30cm long (12-13") or wider and longer for bigger stars. You can buy them ready cut in craft shops. To make one star take 4 paper strips and fold them in half.


Arrange them like this, so they insert into each other:


Now pull the strips' ends in 4 directions to make it tight. Now you have 4 double paper strips pointing in 4 directions. What you need is 8 single strips, 2 on each side. So you start with folding 1 single strip on top of the square.


Go around the square anti clockwise and continue folding single strips. When you get to the 4th strip pull it under the first strip and tighten up. It helps to fold the ends of the strips first, to make it easier to insert them and pull them through.


Now start folding the strip like this:


Fold it again (inwards) and pull through under the strip in the square:


It should look like this:


Then go around the square clockwise and repeat the same action on 3 remaining sides. When you have finished doing this the piece should look like this:


Turn the piece upside down and repeat the last action, so you end up with a flat 8 pointed star and the paper strips sticking out of the middle on both sides:


Now you start making this star 3-dimensional. Take 1 strip, fold it under and over like in the picture, insert it under other strip in the middle and pull through so it comes out of one of the 8 points of the star.


The first of the middle points of the star should look like this when finished:


Continue around the star anti clockwise, until you have 4 middle points:


Turn the piece over and repeat the same action on the other side:


Cut the remaining paper strips off. Your star is ready. You can use these stars to decorate a Christmas tree or in any way you can think of. I think they look pretty good just as a table decoration:


Happy star making.

Yolanta x
Share/Bookmark

Saturday, 5 November 2011

How to make an easy jar opener - gripper

A few years ago, while visiting my son and daughter-in-law in Virginia, she gave me something very useful: a jar opener/gripper, made of rubber with crocheted edges. I have been using it ever since. It really makes jar opening easy-peasy. I wanted to buy similar jar openers for my mum and sister, but I could not find them anywhere in the shops.


Then one day I saw an anti-slip mat in a local home supplies shop, and it dawned on me: I can make the jar openers myself! They are easy to make and they can be a perfect Christmas stocking filler too. Here is what you need: An anti-slip mat, some yarn and a crochet hook.


Cut the square off the mat, about 14cm x 14cm (6" x 6"). Then work around the edge of the square with the crochet, using a double crochet stitch and inserting the crochet hook in the holes on the edges of the mat.


When you come to the corner add three chain loops and continue with a double crochet stitch.


After crocheting around the whole square, work the second row with a double crochet stitch using yarn of a contrasting color. In the corners of the second row add 3 loops, then 1 double crochet stitch, then again 3 more loops. The finished product should look like this:


Try the jar opener on the jar, it will work perfectly well.


Happy crocheting :)

Yolanta
Share/Bookmark